

Guide for administrator
- On the faceATT website, select “login/sign-up” to be redirected to our login screen.
Once redirected, either enter your login credentials (for returning users) or select “Create new account” (for new users) to create your account.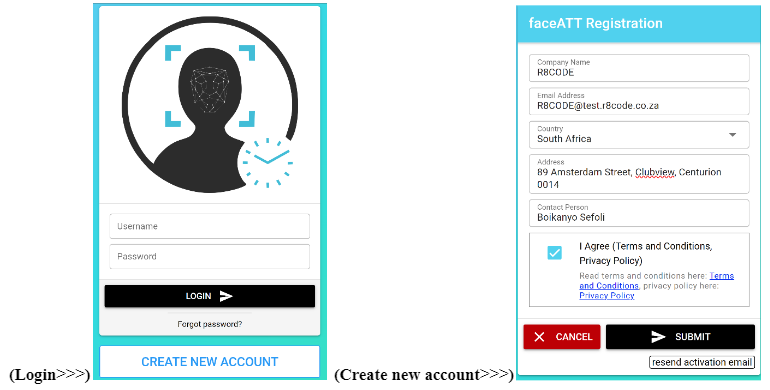
- Once your account has been created, you will receive and email with your login credentials.
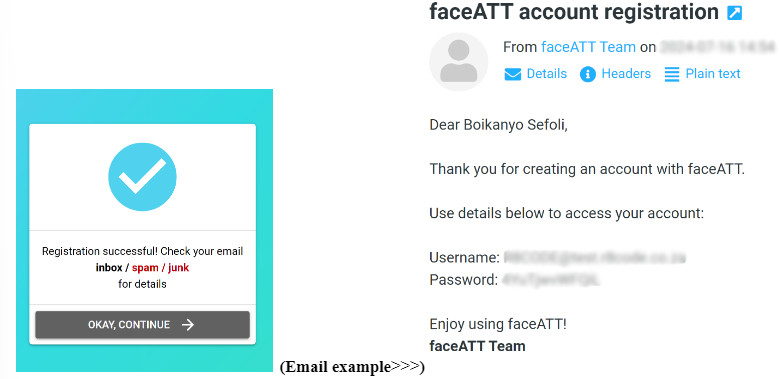
- After selecting “Okay, continue”, you will be redirected to the login screen, use the credentials sent to your email to login.
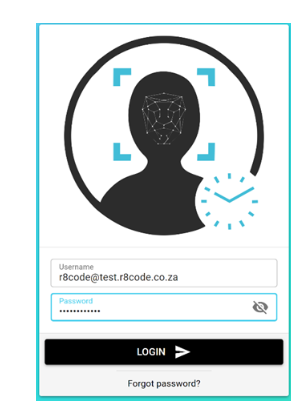
- Enter your credentials and select “Login”.
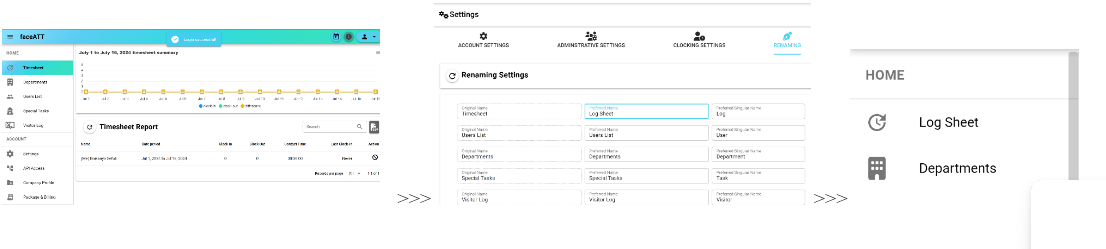
- Locate the menu on your left-hand side.
- The “Time Sheet” Section will be displayed first. This screen allows you to view a list of users, their clock-in/Clock-out time. Please note that the fields displayed under the “Home” section can be renamed to any desired name. e.g.
- Select “Settings” on the menu list, once in the settings select “Renaming” from the list presented above, locate the field you would like to rename and change the name to your desired name, in this instance we have changed “Timesheet” to “Log Sheet”. After renaming the field, select update and the item will be renamed as illustrated below.
- Be sure to change your current password to something more suitable for you, this also helps you remember the password when setting up your device.
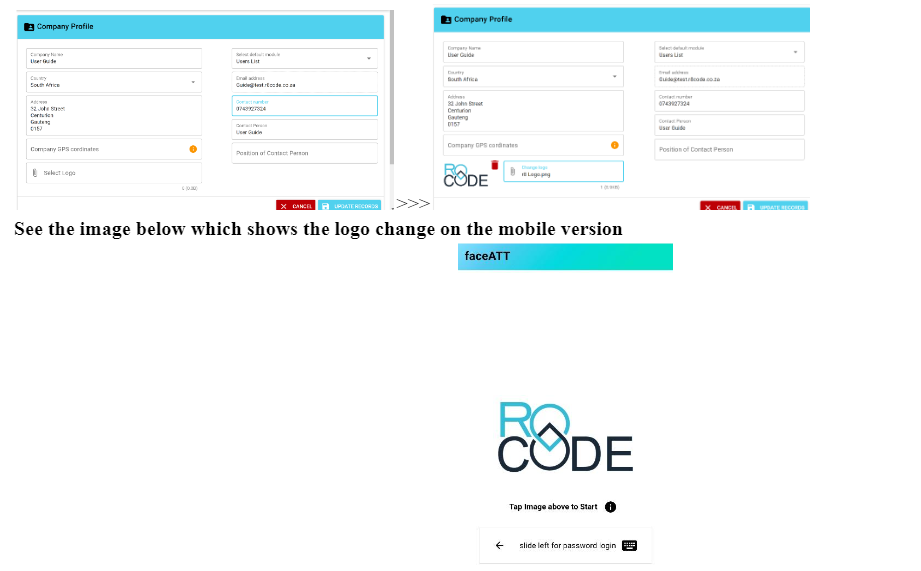
- Additionally, it is advisable that you complete the company profile by filling in empty fields such as “Position of Contact Person” “Contact Number” and you can also change the logo by uploading your company logo, which will appear on your mobile. (See below)
When opening the app for the first time, a screen (Device setup), this is used to link your device to the profile you have created on the web version of faceATT.
- select “Continue” and enter the login credentials sent to your email then select “activate device”
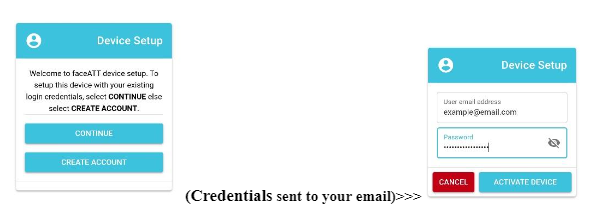
(Credentials sent to your email)>>>
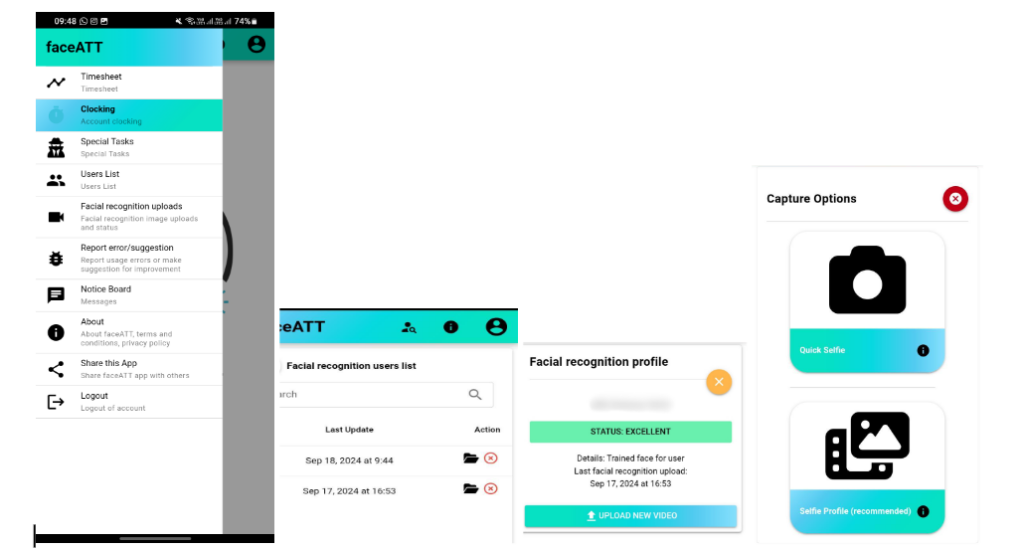
- faceATT will then prompt you to enter your user credentials again, after selecting “submit”, an image upload will be required, select “ok” to continue, select either one of the image-capturing options presented and follow the steps. The system will indicate once the upload is complete.
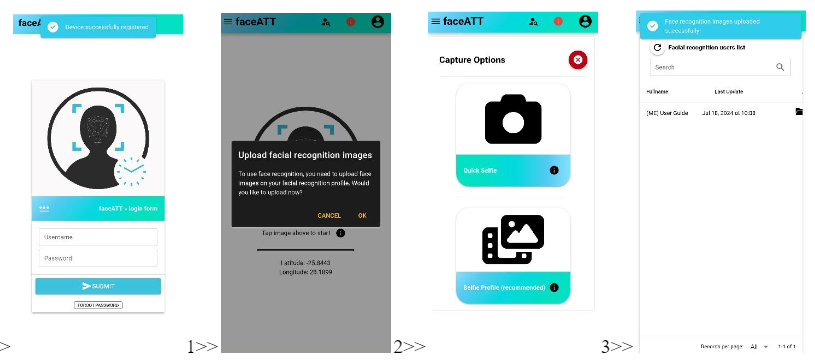
Select “Quick Selfie” to capture an image, select “Selfie Profile” to capture multiple angles. To ensure better detection from the system, it is recommended to use the “Selfie Profile” feature, which allows you to capture different angles.
The more angles you upload, the quicker it becomes for our facial recognition software to detect the user.
To upload an image for another user, go to “Facial Recognition Uploads” and choose the user’s profile. Then, click on “Upload New Video” and select the capture option you prefer.
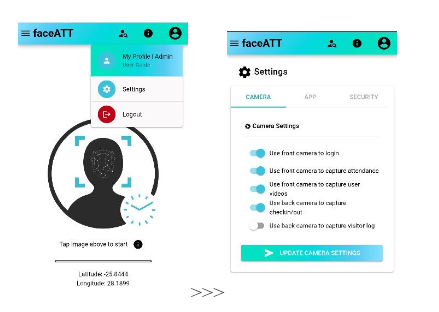
- You can also alter the camera settings to capture images from the back camera, in cases where a single device will be used to scan numerous people. Go to the settings located on your top-right corner under your profile in the mobile version. You can now alter the camera settings but checking or unchecking the buttons presented, then select “Update camera settings”. (See below)
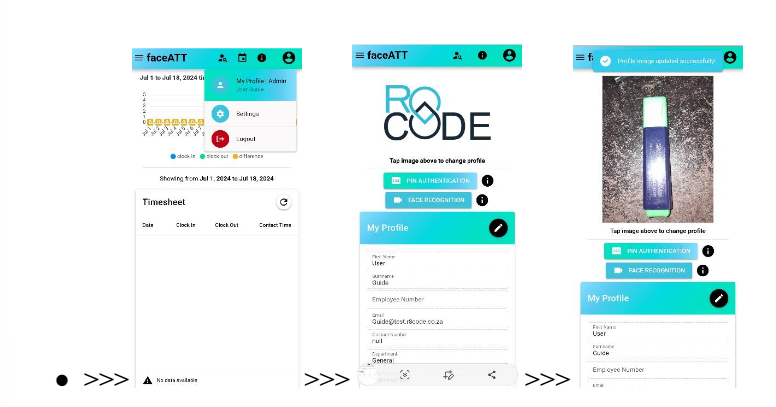
- faceATT also allows a user to set a profile picture on their profile. This can be done by following the steps below.
- Tap on the top right “profile” icon and select “My Profile | Admin”, tap on the image to initiate your camera and then capture an image. Once this is done the user will have a new profile picture.
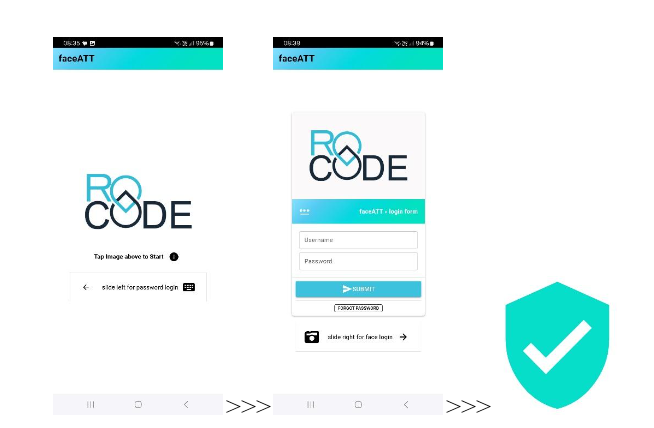
Face Scan Login
- “Tap the faceATT/your company logo to scan your face”
- “Scan your face to login to the faceATT”
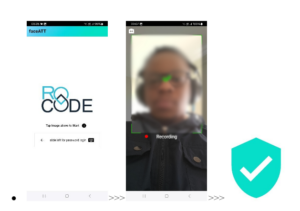
- “Slide the slider to the left to enter your credentials instead” located beneath the faceATT/your company logo.
- “Enter your credentials and click on the submit button”
Adding a department to the system, this will help the categorize users based on their respective departments. When creating a user profile, the departments listed will appear in a dropdown, where the administrator can select an appropriate department to assign to the given user.
Navigate to the “Departments” section on the menu, once selected, click on the “ + ” (plus) button and then fill out the required fields and click submit.
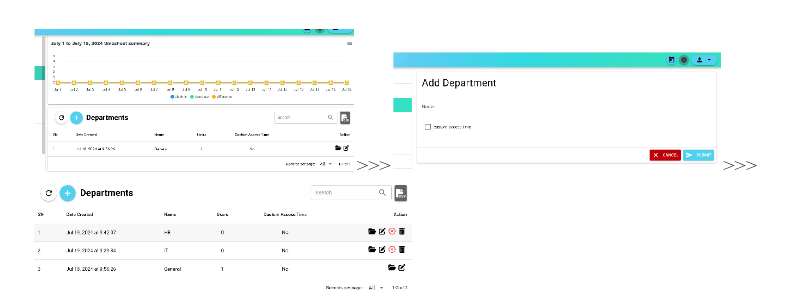
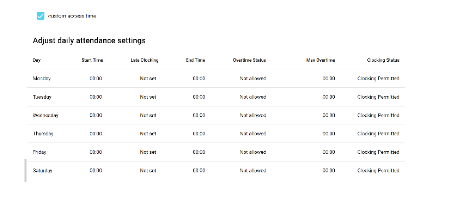
- The unchecked “custom access time” located under the name field can be used to restrict user to a certain timeframe, this will allow control over the times a user can clock-in/out.
Lets start with adding users to the system, these can range from managers to ground staff, depending on your package. Administrator rights can be given to some users and others are standard users.
Navigate to “User list” on the menu, to add a user, select the “+” (plus) button and fill in the form.
- The “Departments” dropdown shows a list of the departments you have added to the system.
- “User category” is determined by the super administrator.
- “Can this user supervise clocking” is a right given by the administrator to determine if the specific user may clock others in/out using their profile.
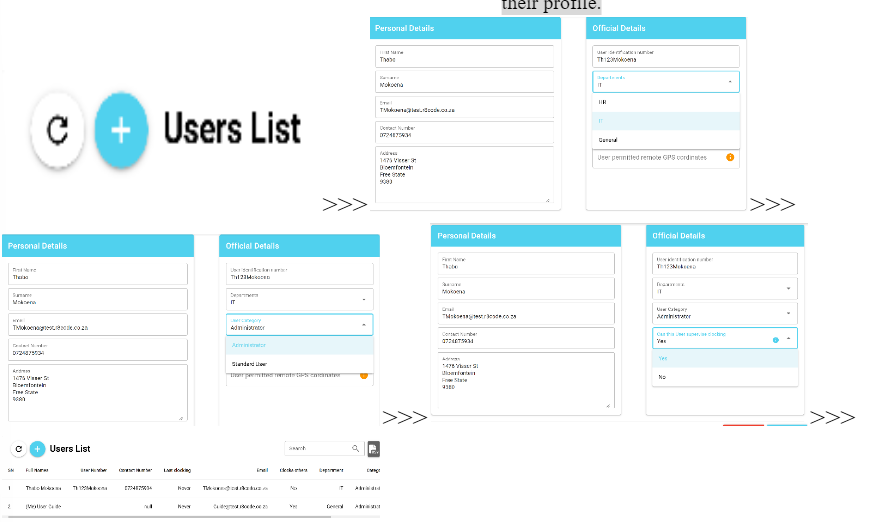
This user will receive an email with their login credentials, which they will use to activate faceATT on their device, by logging in.
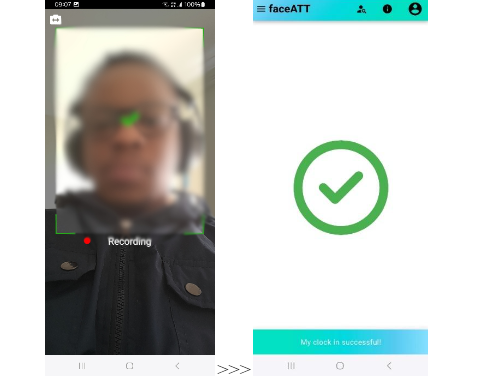
This feature is used to keep track of users clocking in and out of the system using their images to identify them, the data is then stored and displayed in the timesheet section.
- To Clock in, select “Clocking” and then tap on the image displayed to prompt your device camera, afterwards, capture your image and select “ok” when the prompt is displayed to acknowledge clocking in.
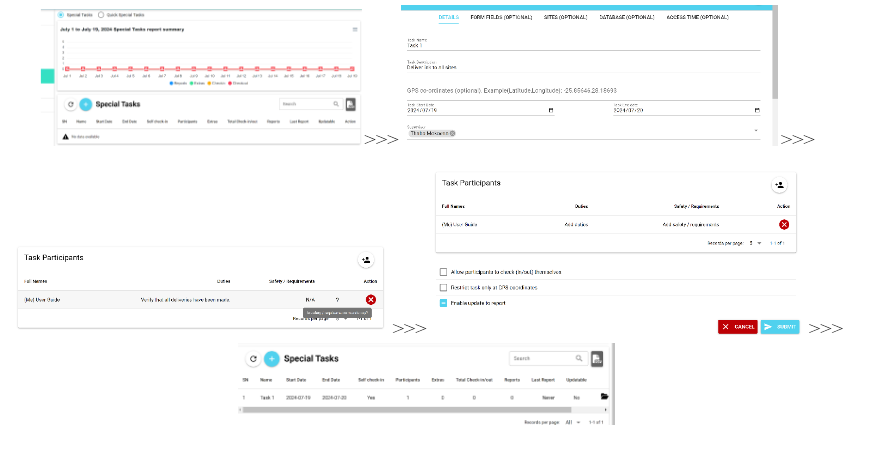
This feature allows the administrator to assign certain tasks to a user, the admin can also choose to restrict a certain task to a given site or location, access time can also be restricted by the admin. To add a special task;
- Navigate to “Special Tasks” on the menu and once selected, select the plus button to add a new task.
- Complete the form as requested and select submit.
- Additional information such as “Form fields” all throughout to “Access time” are optional, for this demonstration, we will not any additional information to the form.
- Once submitted, the assigned user will be able to view the task from their device, check-in, record evidence of the prescribed task as well as check-out once completed.
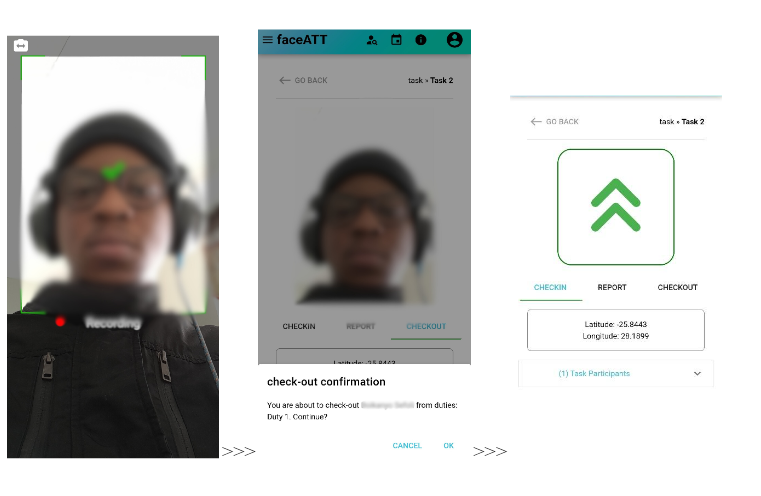
What prescribed user will see on their mobile device
Tasks are created by the administrator, using the special tasks feature and assigned to a specific user.
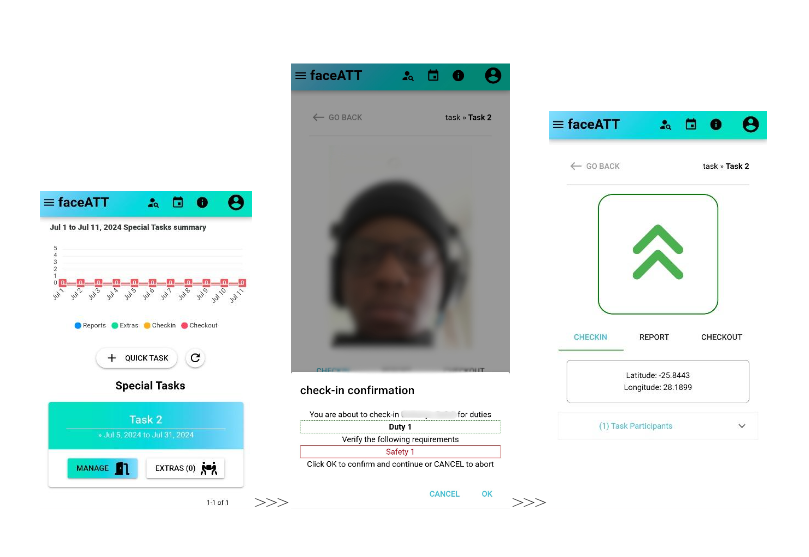
- Select the task and check-in, the system will scan and recognize whether the user check-in is authorized to perform the task.
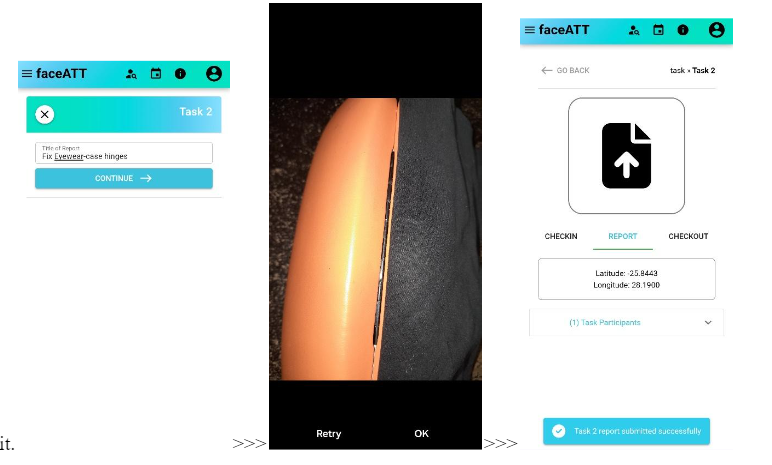
A report can be created by selecting the “report” section, tap the image that appears to activate your camera, label the task, capture it and submit.>>>>>>
Once the task is performed, the user can then check out by selecting the “check-out” section, scanning their face to verify their identity.
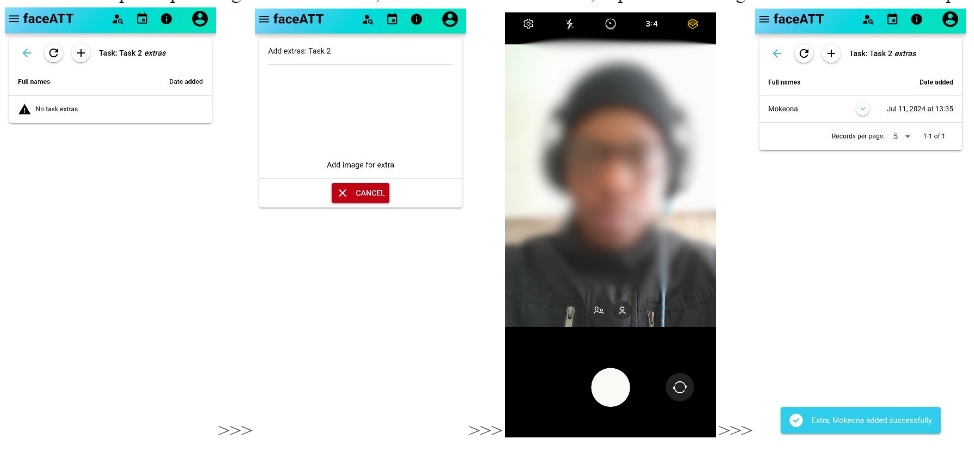
To add additional participants e.g. Casual workers, select the “Extras” button, capture their image and enter the details required.
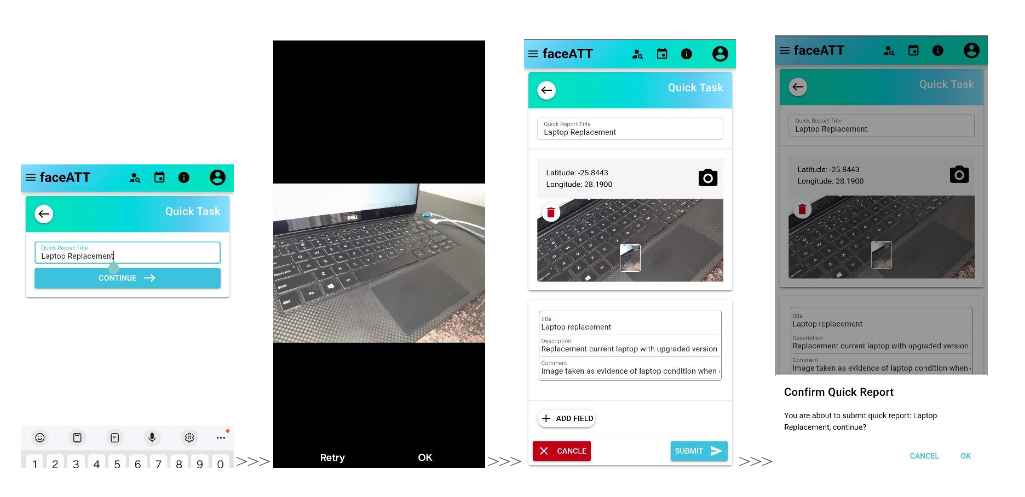
Special tasks section also has a feature named “Quick tasks” where a user can capture any additional tasks completed outside of the assigned task.
Start by selecting “Quick tasks”, give the task a title in the field provided and select “Continue”.
Capture an image of the task/evidence that you would like to provide, enter more details in the fields provided, submit, then select “ok”.
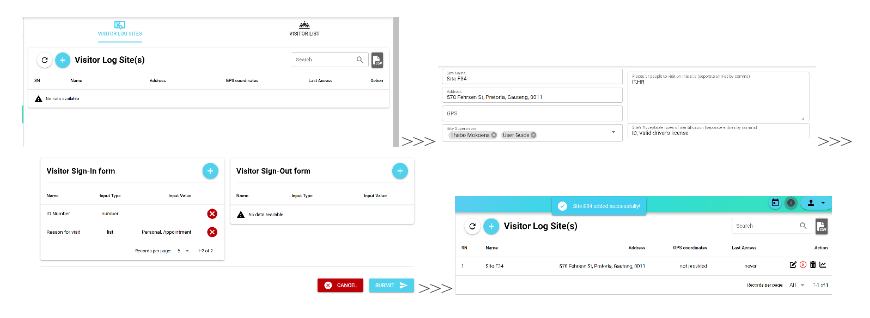
Visitor log keeps track of all visitors that come and go into an area, to record a visitor, select the correct site and capture the visitors’ image.
- To add a site/location for visitor logs, select the plus button to add a new site.
- Complete the form provided.
- Note that the bottom half requires the user to enter some fields, these fields will appear in a form format for the visitor to complete, the user can decide on which information they would like to capture from visitors, and add fields according to their requirements.
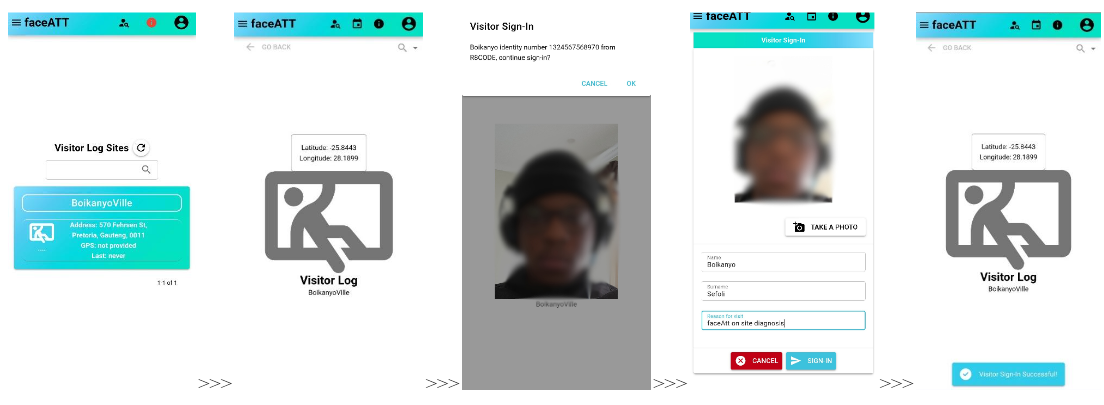
Mobile view
- Select the correct site that has been visited, tap on the icon displayed to capture an image of the visitor.
- The visitor’s details are displayed above once scanned, select “ok” to accept.
- Enter the required details and confirm to continue.
- When signing out a visitor, capture their face again and fill in the required fields (if any).
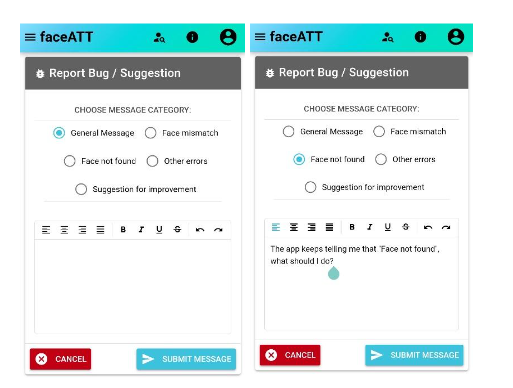
To report any bugs or give suggestions, use the “Report error/suggestions” and select the type message you would like to send, enter the message and then select “Submit Message”.
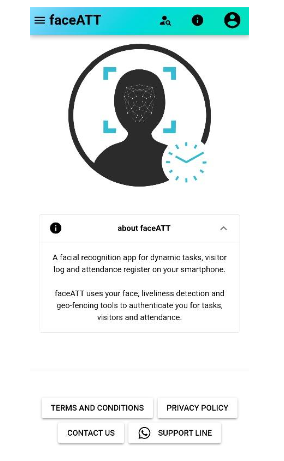
To learn more about the app, select “About”
To adjust the accuracy on your device, navigate to the account settings located under “account” and select “Settings”.
Select “Clocking Settings” then select “More Settings”.
Select one of the 3 options and then click on update.

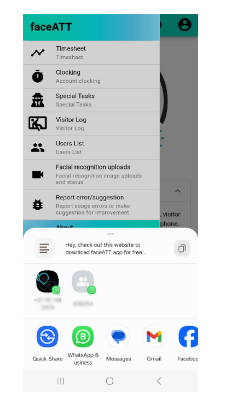
To share the app, select “Share this app”.
Guide for standard user
When opening the app for the first time, a screen (Device setup), this is used to link your device to the profile you have created on the web version of faceATT.
- select “Continue” and enter the login credentials sent to your email then select “activate device”
(Credentials sent to your email)>>>
- faceATT will then prompt you to enter your user credentials again, after selecting “submit”, an image upload will be required, select “ok” to continue, select either one of the image-capturing options presented and follow the steps. The system will indicate once the upload is complete.
Face Scan Login
- “Tap the faceATT/your company logo to scan your face”
- “Scan your face to login to the faceATT”
- “Slide the slider to the left to enter your credentials instead” located beneath the faceATT/your company logo.
- “Enter your credentials and click on the submit button”
This feature is used to keep track of users clocking in and out of the system using their images to identify them, the data is then stored and displayed in the timesheet section.
- To Clock in, select “Clocking” and then tap on the image displayed to prompt your device camera, afterwards, capture your image and select “ok” when the prompt is displayed to acknowledge clocking in.
What prescribed user will see on their mobile device
Tasks are created by the administrator, using the special tasks feature and assigned to a specific user.
- Select the task and check-in, the system will scan and recognize whether the user check-in is authorized to perform the task.
A report can be created by selecting the “report” section, tap the image that appears to activate your camera, label the task, capture it and submit.>>>>>>
Once the task is performed, the user can then check out by selecting the “check-out” section, scanning their face to verify their identity.
To add additional participants e.g. Casual workers, select the “Extras” button, capture their image and enter the details required.
Special tasks section also has a feature named “Quick tasks” where a user can capture any additional tasks completed outside of the assigned task.
Start by selecting “Quick tasks”, give the task a title in the field provided and select “Continue”.
Capture an image of the task/evidence that you would like to provide, enter more details in the fields provided, submit, then select “ok”.
Mobile view
- Select the correct site that has been visited, tap on the icon displayed to capture an image of the visitor.
- The visitor’s details are displayed above once scanned, select “ok” to accept.
- Enter the required details and confirm to continue.
- When signing out a visitor, capture their face again and fill in the required fields (if any).
To report any bugs or give suggestions, use the “Report error/suggestions” and select the type message you would like to send, enter the message and then select “Submit Message”.
To learn more about the app, select “About”
To share the app, select “Share this app”.